In common with most things in life, we want the best of both worlds – studs that won’t budge in situ but are removed with a mere twist on demand. For secure stud fastening, makers tightened studs dry into components, firmly ensuring they had a sporting chance of remaining put. Fitters’ over-zealous tightening sometimes stretched threads, giving an even more secure fastening, and in most cases awkward dismantling at a later date wasn’t the motorcycle manufacturer’s problem. More recently built machines may have thread-locking fluids applied to stud threads.
Age plays a major part with our classic and older motorcycles. No matter how we care for our motorcycles, they’ll be caught out in the wet and exposed to humid conditions. Long-term these factors cause metal corrosion with steel studs and aluminium or cast-iron components. Even the oxides of dissimilar metals such as aluminium and steel bond within the fastener and the resultant oxide occupies more space than the original metal, creating the same effect as if the metals had expanded. All of which locks the threads tighter and tighter over time.
Enjoy more The Classic MotorCycle Magazine reading every month.
Click here to subscribe & save.
Dirt or paint stuck to the studs or components, when compressed within the fastener situation, locks threads too. Some modern two-pack paints take three months or more to complete their ‘going off’ process; if compressed under the fastener situation in this period such paint serves as an excellent (but not recommended) locking agent.
Reference is made from time to time of threads locking because of 'galling'. However, it’s a rare occurrence created when like metals fuse together because of extreme heat, causing their surfaces to soften and bond. It’s rather like fusion welding of old when metals were heated till soft, then hammered or vigorously pressed together to form the fusion weld. This occurs in the fastener situation where long threads are screwed together dry and without lubrication, often at speed with minute surface particles and abrasions creating friction, excess heat is generated and galling occurs.
'Every time I reach for the stud extractor box my heart sinks so I generally bypass them. They are the last resort before a visit to an engineer'
Claims have been made of galling occurring with steel or stainless steel studs into aluminium. Although producing a similar phenomenon, the effect is usually caused by friction heating the threads as the fastener is rapidly tightened and the softer material’s surface softening or even mildly melting. On hardening it bonds to the harder metal to which it’s now shaped, however, it’s a bond rather than a fusion. Both occurrences are rare but, if there’s a risk, a drop of lubricant on the threads will reduce friction and heat on tightening. The desirability of this action is discussed later.
Different treatments
Freezing may break the screw thread bond of like materials. I’ve only limited success, but it has worked with mild or high-tensile steel studs in cast-iron components. Freezing agents also penetrate rapidly by capillary action to quickly reduce temperature to around 40C as a shock treatment. Most proprietary agents contain a lubricant, too.
Rapid heating of stud and threaded area of component is a shock treatment which often works. It also serves to break the bond of threaded locking agents such as Loctite Thread Lock which are susceptible to temperatures much higher than those normally encountered within the operational engine. Heat also helps break the bond caused by dirt, dried oils, paint and even rust.
Aluminium casings, unless cast in with an aluminium alloy with silicone or the like, expand more than steel. Some heat casings with gas torches or even welding torches but unless competently done this will cause uneven heating with risks of distortion and cracks opening. It’s also worth remembering: aluminium melts instantly giving no sign of the impending disaster. Instead, half an hour in the family oven at 240-280C works well – the hot parts are safely handled with industrial welding type heatproof gloves. Engines in our family oven go down like a lead balloon, so we’ve and old electric cooker installed in the shed for such jobs.
Using an appropriate socket or screwdriver blade on an impact driver is an effective method of delivering impact shock and an unfastening action simultaneously.
Worrying away at the job with this range of agents will bring success in most cases and few broken studs. If all fails run through the repertoire again.
Stud removal
When I worked as a teenager in the motor trade during the mid-1960s some back-street garage stores, in common with many rivals, heaved under the weight of dodgy tools designed, they claimed, to aid DIY repairs. Already working on motorcycles, I fancied a stud extractor which was guaranteed to remove all studs with ease for just 19/11d (99p). Luckily a kindly but gruff mechanic took me aside, demonstrated how such tools would mess up the thread (not quite the phrase he used!) and how I’d be better continuing to lock two nuts together.
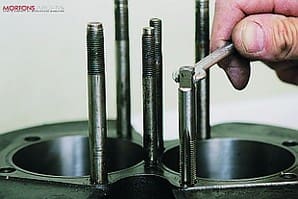
To extract a willing stud, lock two nuts of appropriate thread and size together and apply spanner force to the lower nut to remove stud. The use of pliers, mole-grips and locking extractors will damage the threads.
When stud threads are damaged beyond use or salvage, stud removal may be effected with vice grips or a proprietary external stud extractor used in conjunction with a square drive socket set wrench. Further thread damage will result but studs in this condition need renewal. Repeated application of thread lubricants or heat will help free stubborn studs but undue force results in broken studs.
If a stud has broken above the component surface level there’s a sporting chance of removing it without resorting to the drill box. Casing studs are of mild steel and break easily while high-tensile steel studs are reserved for cylinder and cylinder-head fastenings, which break less easily. Unfortunately studs will have broken in the first place for the very good reason that they are seized.
The options are pliers, vice grips and external stud extractors. After treating with freeing agents, grip stud firmly with pliers, vice grips or stud extractor if sufficient stud is exposed. If stud still won’t budge continue with freeing agents or heat as appropriate.
Sometimes you can cut a screwdriver-type slot in crown of stud and apply an impact driver action in usual manner. Should the stud move, it can then be screwed out with a screwdriver or pliers. Impact drivers have more success on an assembled engine, which is harboured to the frame. If you're trying to remove a stud on a portion of engine casing on the bench, it's not – usually – an effective method, and you'll end up chasing the casing around the workbench or floor!
Internal stud extractors are slim, hardened-steel tools bearing a coarse sharp spiral thread of the opposite hand to the seized stud. Intended for use with studs which have broken off at surface level or below, most brands require a hole of a given diameter accurately drilled into the centre of the stud to a depth recommended in the instructions. Some sets include appropriate drills, too. The stud extractor is screwed into the stud’s pre-drilled hole, grips and on further tightening due to its opposite thread spiral, out comes the stud.
Brilliant… except the tools are much slimmer than the stud to be extracted and owing to the hard nature are brittle, meaning they snap easily, worsening the problem as part of the hardened tool remains implanted in the centre of the stud necessitating its removal before the stud can be drilled out. Another downside is that, as the tool grips, it can expand what’s left of the stud within its component screw thread making it grip even tighter. Occasionally they’ve worked for me but every time I reach for the stud extractor box my heart sinks, so I generally bypass them and move onto the drilling-out method.
For years I’ve crudely welded nuts onto broken studs with an electric welder. The heat generated is a bonus as it acts as a freeing agent and with luck the stud will ‘spanner’ out. Recently a local VMCC club friend Brian Gathercole introduced me to another, very smart, idea. If room allows weld an old ‘gash’ bar or strip to the stud; again the heat helps and the stud is spun free with the bar.
Any thin oil, brake fluid, automatic transmission fluid, diesel, central heating oil and even paraffin has both lubrication and penetration properties making them usable, albeit with varying degrees of success in the fastener situation. These thin lubricants penetrate the threads by capillary action, a process which works regardless of the position of the fastener.
Fluids like paraffin penetrate well but don’t – despite their mildly oily nature – lubricate as well as thin oils. However, thin oils, which lubricate better, may not penetrate as well. To offer the best of both worlds, makers have developed fluids offering good penetration and lubrication properties.
Penetrating lubricants are applied to the base of the thread giving them the best chance to travel the length of the thread by capillary action. If they disappear into the thread rapidly, apply further treatments. It’s an ideal approach, if just a few studs are giving a problems, or the component is being dismantled in situ on the motorcycle.
Faced with heavily corroded engines, gearboxes etc or those which have been untouched for decades, I favour the diesel treatment. Unblock all openings, sparking plugs, drain plugs and filters then leave submerged for a month in a vat of diesel. It is amazing how many fasteners free, and the process can loosen rust-seized pistons, shafts and bearings and loosens much external grime to start the cleaning process. However, it will destroy rubber components – but these aren’t often reusable.
Finishing off
Assuming threads are in sound order or casing threads are good and new studs are being used, fitting studs is far easier than removing them.
Scrupulously clean threads with solvent and dry. Finish cleaning process by running appropriate die over stud threads and plug tap into casing threads. It’s worth noting that for many classic machines, stud threads into aluminium are coarser, eg BSW, UNC or Metric are coarse, while fastener threads at the fastener end of studs are finer, eg BSC, UNF or a finer Metric. The same doesn’t apply to some older veteran and vintage machines, where fine threads were used into aluminium. The logic of the coarse/fine mix is that the coarse thread gives the stud secure purchase into the aluminium with less risk of stripping the soft material’s thread. But, unfortunately, coarse threads are more prone to shake free in situations where vibration may occur such as engines and are less easy to tighten securely because of their coarse nature. Therefore fine threads are desirable for the stud-to-fastener nut situation.
Next, screw in stud, apply spanner to upper of two locked together nuts on exposed fine thread. Here the disagreements start. Some advocate the use of a lubricant to ease the stud home and prevent the risk of galling, both of which the lubricant does. However, studs screwed in dry gain a better grip within the casing threads, lessening the risk of loosening in use or at the next dismantle. To lessen the risk of galling with dry threads, fasten slowly, allowing heat to dissipate.
To ensure secure stud-to-casing thread bond, a drop of thread lock is applied to end of thread. It serves two purposes in lubricating the thread on screwing it home and the process of firmly tightening the stud home activates the thread lock which securely bonds the fastening together – but still allows removal in the future.